
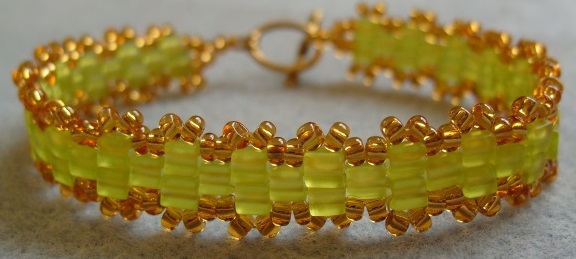
Easy to make bracelet with Miyuki cubes and seed beads
 |
| Designed by Sue at Little Beader. |
For this bracelet I have used 4mm Miyuki cubes, size 8/0 seed beads, a small gold plated toggle clasp,
S-lon beading thread and two beading needles.
Cut about 1½ metres of beading thread and thread one needle onto each end.

1. Fold the thread in half and bring the needles together, pass both needles through the eye of the clasp and pull through until there is a small loop left. Put both needles through the loop and pull up.
Repeat again to form a strong knot.
Thread 2 x 8/0 seed beads over both threads as shown.

2. Separate the threads and thread 2 seed beads onto each one.

3. Next add one cube to each thread.

4. Bring the needles back together and pass them both through a cube bead.


5. Repeat steps 3 and 4 until you have the length required but end with 2 cubes on separate threads as in step 3.

6. Thread 2 seed beads onto each thread.

7. Pass both threads through 2 seed beads.

8. Pass one needle through the loop on the other end of the clasp, tie both threads together with a square knot. Then pass both needles though the loop on the clasp and pull through until you have a small loop. Pass both needles through the loop and pull up to create a firm knot.

9. Now using just one thread and working back the other way, bring the needle back down through the first 2 seed beads, then the next 2 seed beads on one side of the bracelet and through
the first cube bead.

10. Add 2 seed beads and bring the thread around and back through the first cube bead again. The seed beads should be sitting on top of the cube bead as shown in the picture.

11. Add another 2 seed beads and pass the needle through the next cube bead along.
The seed beads should be sitting in the gap between the cube beads as shown.
12. Repeat steps 10 and 11 until you reach the other end.
13. Repeat steps 10 and 11 down the other side of your bracelet
using the other thread.
14. Pass one thread through the loop of the clasp, knot the threads together and pass each thread back through a few beads and snip off the ends.
You can put a tiny dab of clear glue on your knot if you wish.
All done!


Here's some I made earlier!
Thanks for looking!
~🌼~🌼~🌼~

~🌼~🌼~🌼~
~🌼~🌼~🌼~
~🌼~🌼~🌼~
What a lovely bracelet very easy instructions thank you
ReplyDeleteThank-you Denise x
Delete